The Ultimate Mini Scrapbook Album Tutorial!
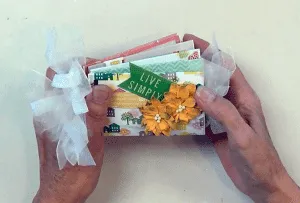
A miniature scrapbook is a quick and easy way to showcase a few special photos and mementos in a creative way, rather than just the standard brag book.
Miniature scrapbooks make great gifts and can be made for almost any occasion.
Although there are all sorts of mini albums, one of the most popular types is the accordion scrapbook.
This ultimate miniature scrapbook tutorial will provide you with step by step instructions on how to create a very special mini album for your favorite photos that even those that are learning how to scrapbook can do.
For this particular mini scrapbook album tutorial, we will be creating a 3 in. x 4 in. album containing 10 layouts.
Supplies Needed For Your Mini Scrapbook Tutorial:

Mini Scrapbooks Make The Perfect Handmade Gift!
♥ 1 12 x 12 sheet of cardstock (whatever color you choose)
♥ 1 package of message scrapbook stickers or a ♥ 12 x 12 sheet of journal cards
♥ 1 chipboard
♥cardstock and scrapbook paper scraps
♥ 2 ft long piece of ribbon
♥ Photos
♥ Liquid glue
♥ Paper cutter
♥ Scissors
♥ Shape punch
Step 1. Cut, Score and Fold Cardstock.
The first step in our mini scrapbook tutorial is to create an accordion folded scrapbook page effect.
With the use of a paper cutter, cut one sheet of 12 x 12 cardstock into three equal strips. Score and fold each strip into four equal sections. Each section should measure 3 in. x 4 in.
Want to learn more fun and creative mini book layouts for your next project? Click here and check out Scrapbook Layout Books!


Step 2. Attach Folded Cardstock.
Use adhesive tape to attach the sections as follows. After each strip has been folded, attach the first section of the second strip to the last section of the first strip, by overlapping the sections.
Attach the first section of the third strip to the last section of the second strip. This will make one continuous fold. Please note that glue from a glue stick can dry over time and liquid glue can seep through the cardstock. Thus, adhesive tape works best.
Step 3. Design Front and Back Cover.
The next step of our mini album guide is to design the outside of the album. Measure and cut the chipboard so that it forms a quarter inch border around the folded cardstock. You will need to cut two pieces. Using scrap cardstock or scrapbooking paper, design the front and back cover. Keep the back cover simple by just adding a piece of cardstock or paper. For the front cover, along with adding paper, give dimension to the cover, such as adding buttons, a metal charm or a die cut with the title of the album on it.
Step 4. Plan Layouts.
Now for the really fun part of our mini album guide, you're ready to plan the layout for each of the ten sections.
Unfold the cardstock and decide where you want to place your photos, message stickers, journal cards, embellishments, and other small tokens. Using a shape punch, you can create a special matting for a photo or you can use a piece of cardstock and make a miniature card out of it.
Punch the shape into the front of the card and place a message inside of the card. With mini scrapbooks, it's not necessary to add a background to each section, you can simply create watercolor backgrounds for a subtle effect. Most likely your photos, message stickers and journal cards will fill up a section.
If you have a special token, such as a foreign coin or a charm, create a clear pocket for one of the sections and place the item in it.
This particular mini album is designed to use just one side of the cardstock. The scrapbook will fold easier and not be as bulky. Other mini scrapbooks are designed to use both sides of the cardstock.
TIP: Check out our article about the best scrapbook blogs online and get access to the best quality scrapbooking content available online!


Step 5. Assemble the Mini Scrapbook.
The final step of our beginners make a mini book project tutorial is assembling the scrapbook.
Begin by centering your two foot piece of ribbon in the middle of the back cover.
Secure with adhesive tape or liquid glue.
Then tape the last section of the folded cardstock to the back cover. Tape the first section of the cardstock to the front cover. Wrap the ribbon around the album and tie it into a bow.
The accordion style miniature scrapbook is just one of the many ways to create a small album. Here are some other clever ideas:
♥ Purchase mini albums (brag books) and scrapbook each page.
♥ Cut cardstock into equal sizes (i.e. 4 x 4 squares) and attach the pages with ribbon or twine.
♥ Purchase colored unlined index cards. Make a front and back cover out of chipboard. Assemble the album with metal rings.
♥ Experiment with your folds and create a fun design of your own.
♥ Instead of making a cover, use a small tin box to house the pages.
The next time you have a few free minutes, put this scrapbook mini album guide to use. The beauty of creating scrapbook mini album using basic supplies is that it doesn't take a lot of time and can be done in one sitting or whenever you have a few minutes to work on it. Whether you give the album as a gift or keep it for yourself, your mini album will certainly be a cherished one and it's a lovely variation of traditional scrapbooking layout inspirations!
Topic: Mini Scrapbook page Tutorial
HERE'S SOME OTHER SCRAPBOOKING ARTICLES THAT YOU MAY FIND HELPFUL
The Top 5 Scrapbooking Tools That Are Proven To Help You Create Better Layouts
12×12 Scrapbook Layouts Tips You Should Never Miss!
5 Tips To Creating Catchy Scrapbook Titles For Your Layouts
TOP 5 Scrapbooking Ideas I LOVE!
How to Scrapbook: The Ultimate 'Learning How to Scrapbook for Beginners'
Scrapbooking Tips: 10 Tips To Help You Create Even More Enchanting Pages!
5 Simple Scrapbook Organization Ideas and Tips!
Scrapbook Stores Online: Shop from the Top 7 Best Craft Stores
Contact Us | Login | Store | About | Reviews | Privacy Policy | Terms & Conditions | Returns
Copyright © 2025 by ScrapbookingCoach.com
We accept payment with:


