
5 Tips To Creating An Exquisite Mini Scrapbook
+ Bonus Mini Scrapbooking Album Tutorial For Your Photos
One of the hottest trends in the world of scrapbooking is utilizing mini scrapbook album ideas in place of the popular 12×12 albums.
Why mini scrapbooking? Whether used as a standalone or to enhance your scrapbook pages, mini scrapbooks allow you to showcase one theme that is captured in just a few pages.
Besides, these mini albums are a cute way to share your favorite photos and fun memories with family and friends!
Here are five cool scrapbook tips to help you make your own lovely mini book projects!
Tip 1. Decide on the purpose of your mini scrapbook. Standalone or enhance an old page.
This DIY mini album project is created from toilet cardboard rolls.
As mentioned above, mini scrapbooks can be an actual album, or it can be used to add something unexpected to an older page.
Want to see more miniature scrapbook layouts? Click here and check out our Layout Ideas Books and discover more fun layouts for your scrapbook!
The first step you need to decide on is the purpose of your mini book album.
If it's going to be a standalone album, you can make the album yourself or purchase a small photo album (the type that holds one photo per sleeve).
Small photo albums can be purchased at a retail store, a craft store, or even a dollar store.
If you are thinking about using a mini scrapbook to enhance a 12×12 scrapbook page or even a handmade greeting card, make an album of six front/back pages or less.
Usually, when a mini scrapbook is used in this matter, the purpose of the scrapbook pages is to provide more details of the theme.
For example, let's say you want to make some scrapbook layouts about memories of your child enjoying his birthday cake as he turns two.
The other page might contain photos of your daughter helping to make the cake, the two of you decorating the cake, your son running his finger through the frosting, etc.
Tip 2. Design a mini scrapbook that will stay together. Binding matters.
In regards to miniature scrapbook album ideas, it all starts with making a sturdy, long-lasting album.
First, decide on the size of the album you want to do. A popular size is 4×6 inches.

Ring-binding is perfect for a chunky scrapbook album. They can also be adorned with lace and ribbons.
If your miniature photo scrapbook album is standalone like a bullet journal scrapbook type, then you have all sorts of binding options. A simple, yet elegant method is to punch two or three holes along the left side or top of your album and use mini metal rings, brass fasteners, yarn, twine, or ribbon to fasten the pages together.
Another fun option is to fold card stock into three sections, leaving a one-inch strip to adhere to the back cover. When the album is open, you simply unfold the page, revealing six pages.
You could also use one of the cardstocks as the main section (outside) of the mini scrapbook. Fold and cut a cardstock so that it is double the size of the desired scrapbook. Only use three or four sheets of cardstock, otherwise, your album will be too thick and may not stay together well.
Using liquid glue, glue each folded cardstock separately to the centerfold of the main cardstock. Press the album together and let the glue thoroughly dry.
You may also try to place the cardstock pages in one pile. Fold the top cardstock in half to form a crease. Open the cardstock back up and sew along the crease.
Tip 3. Create a dimensional mini scrapbook album cover for your photos. Add depth.
You can use your background papers as color inspiration for your scrapbook album cover.
When creating mini scrapbooks, if the scrapbook is going to be attached to a scrapbook page or a greeting card, you'll want to keep each page as flat as possible. For instance, avoid using buttons, puffy stickers, etc.
However, be creative with the scrapbook cover! By adding some dimension to the design, it will draw special attention to the mini book.
Here are some ideas:
♥ Make a title with corrugated letters
♥ Incorporate tiny buttons or hearts
♥ Make a border out of lace, ribbon or twine
♥ Design a die cut for the center of the cover and adhere it with foam tape
♥ Use tiny flowers at the top of the cover
♥ Have a layered effect by using different sheets of cardstock

Tip 4. Use the same background throughout the mini scrapbook. Consistency.
As you try out various miniature scrapbook album ideas, consider using the same background for each page. Since a mini scrapbook contains just a few pages intended to bring extra attention to a particular theme, let your favorite photos be the main focal point.
If you're making a miniature scrapbook rather than using a purchased album, then your cardstock can be used as the background.
Decide ahead of time if you want to keep the background natural, or if using color is appropriate.
For example, if the mini album is about a baby girl, then using pink, purple, yellow, or green as the background is a great idea.
If you're going to use a small photo album for your scrapbook, cardstock might be too thick. Scrapbook papers would be a better option for your background.
Press Play On The Video Below To See How We Add Texture & Dimension Instantly To Any Scrapbook Project With Gorgeous Results!
Tip 5. Keep your scrapbook journaling simple. Words or phrases work best.
One of the key things to keep in mind while creating mini scrapbooks is to keep your writing to a minimum.
Many mini scrapbooks don't contain any writing. Each page has a photo with little or no embellishments. If you do choose to include writing, use just a word or a phrase—something that will enhance the photo.
Another option is to use a printed word or message stickers.
One of the great things about mini scrapbooking is that in a small amount of time you can come up with something that is fun, creative, and exquisite that you can gift to your family and friends.
Fewer supplies will be needed and this is the type of project that you can easily work on when you have a spare 15 or 20 minutes. You may also apply these need-to-know scrapbooking techniques to your mini scrapbook album.
Bonus: The Ultimate Mini Scrapbook Album Tutorial!
A miniature scrapbook is a quick and easy way to showcase a few special photos and life mementos in a creative way, rather than just the standard brag book.
Miniature scrapbooks or mini scrapbook albums make great gifts and can be made for almost any occasion. Although there are all sorts of mini albums, one of the most popular types is the
toilet cardboard roll scrapbook.
This ultimate miniature scrapbook album tutorial will provide you with step-by-step instructions on how to make a very special DIY mini album for your favorite photos that even veteran and beginner scrapbookers alike will enjoy creating!
Excited to make your own mini album from toilet cardboard roll?
Speaking of beginners, if you've just recently started your scrapbooking journey, then you should check out our article about how to scrapbook and you should be able to scrapbook like a pro in no time!
Here Are The Supplies Needed For Your Mini Scrapbook Tutorial:

Come Up With The Perfect Handmade Gift with this DIY Craft Tutorial!
♥ 5 empty toilet cardboard roll
♥ 6x6 paper pad of your choicem(for this project, I used the pad Yes, Please!
by Amy Tangerine for American Crafts)
♥ White acrylic paint to coordinate with my choice of papers, and a paintbrush
♥ Embellishments: flowers, charms, buttons, etc.
♥ Xyron 9" Create-a-Sticker (this is optional, you can also use acid-free double-sided tape or glue)
♥ Distress or chalk ink to coordinate with my choice of papers (this is going to be used on the edges of our papers and cardboard rolls), and an ink applicator
♥ Tim Holtz Tiny Attacher
♥ Binding System or Book Rings (only if you want to have your album ring bound)
♥ Your choice of frilly embellishments like ribbons, lace, tulle, etc.
Mini Scrapbook Album Step-by-Step Tutorial
Let's Get Started!
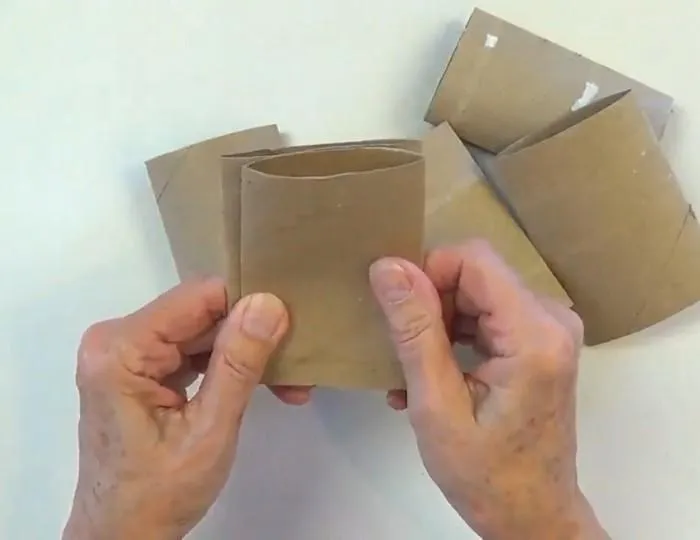
Step 1. Prepare Your Toilet Paper Cardboard Rolls.
The first thing to do is to flatten your toilet cardboard rolls. This will serve as a perfect pocket for our tags later. Don't forget to measure your flattened rolls against each other as we want to make sure that we have the same sizes.
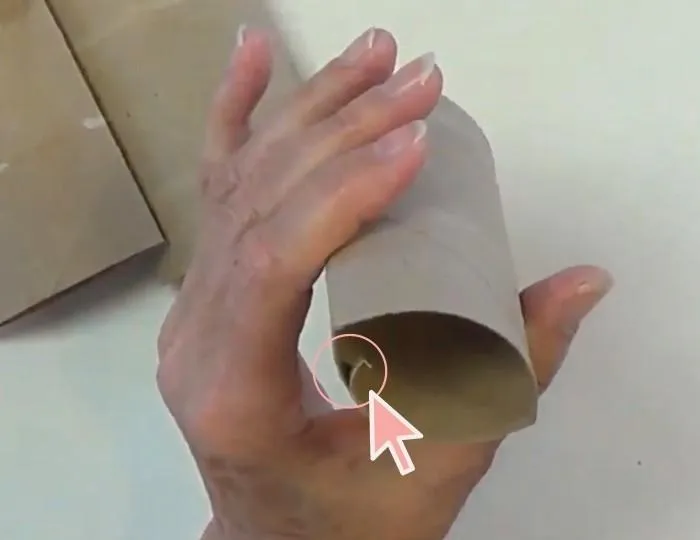
Check your rolls for any unfurlings. A simple glue to keep them intact will suffice.
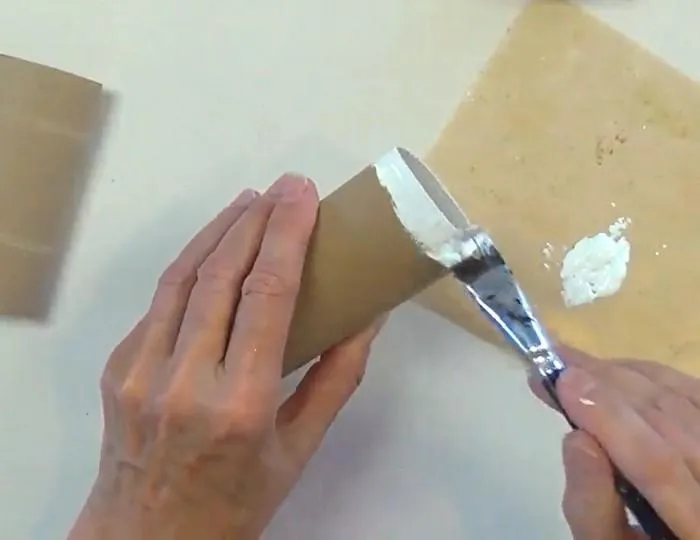
We want a clean finish for our album so go ahead and paint both ends of your cardboard rolls a color that you like or that will complement well with your choice of papers.
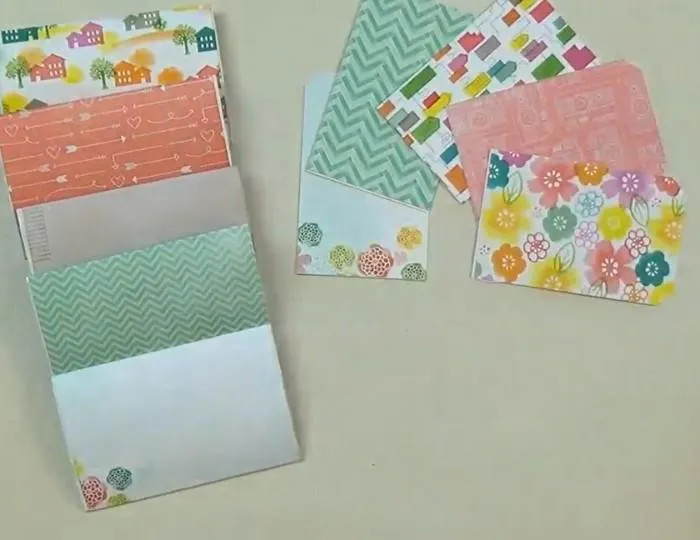
Step 2. Choose Your Scrapbook Album Backgrounds.
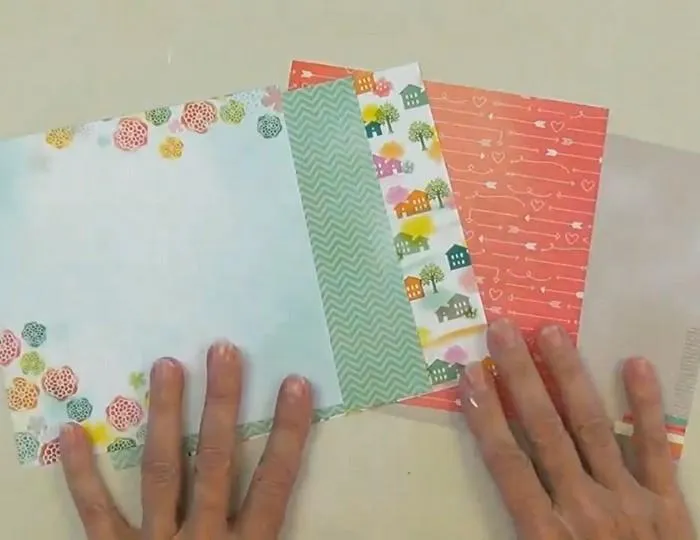
Here are the designs I have chosen from my 6x6 paper pad from Yes, Please by Amy Tangerine for American Crafts. Aren't they lovely?
Try to play around with your choices of theme and combinations of scrapbook papers!
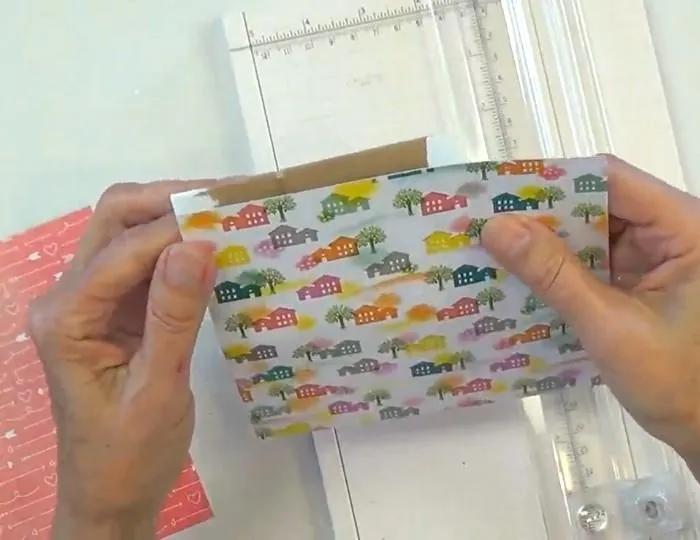
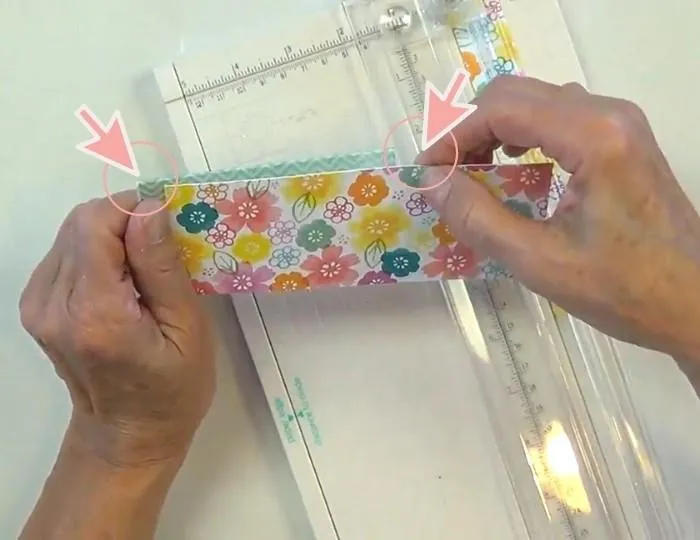
Measure the length of your cardboard roll with your paper. We want to cut our paper just a smidge less from the length of our cardboard roll.
This is also the time to try out how you want your printed paper to wrap around your toilet cardboard roll. Take into consideration the direction of your prints as well.
After cutting the papers to the right size, I decided to stamp the edges with my Distress ink in Antique Linen. This will cover up the whites and make the edges of our paper stand out more.
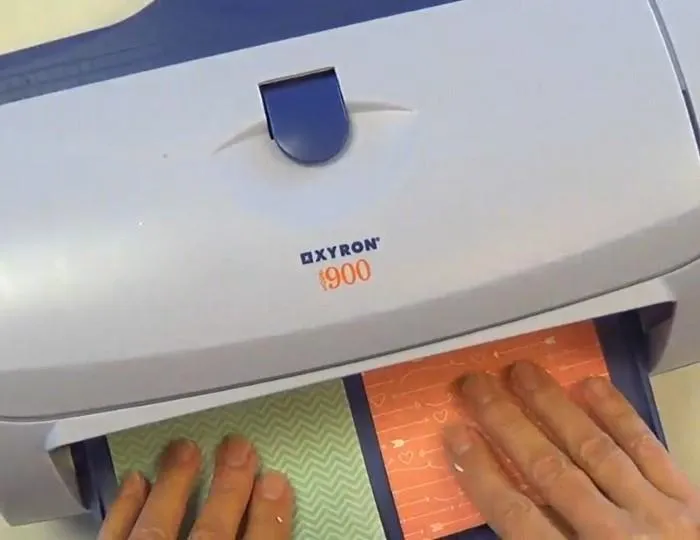
There are a few ways you can cover your toilet cardboard rolls with your background papers, you can use double-sided tapes or acid-free glue to adhere the paper to the toilet roll. As for me, I used my Xyron 900 Create-a-Sticker machine for full coverage and less sticky mess.
When using your Xyron, remember to put your printed design up as the adhesive is going to be placed on the back.
Now we get to wrapping! Make sure that your paper is aligned with your cardboard roll correctly or you end up with uneven wrapping. As you wrap around, don't be scared to apply pressure and really get your paper to stick on your roll, especially on the creases to prevent any trapped air or bubbling.
Repeat the process on all your toilet cardboard rolls.
After wrapping all your pretty papers, check the sides for any excess paper that needs to be trimmed down. And to make sure that your paper has properly adhered to your paper roll, I would suggest using a bone folder to flatten it more.
Hooray! Now we're all done crafting the base elements for our mini scrapbook album, it's time to start the fun part: decorating and putting our album together!
OUR BEST SELLING BOOKS


Click here to download the PDF version for the tutorial on how to create the tags.
Hooray! Now we're all done crafting the base elements for our miniature scrapbook album, it's time to start the fun part: decorating and putting our album together!
Step 3. Making Your Scrapbook Album Cover.
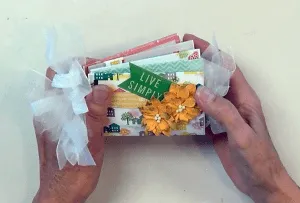
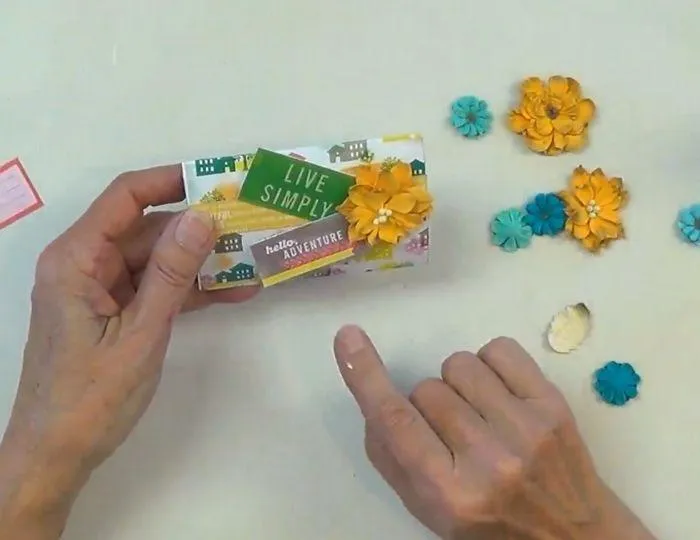
I decided to go with the house's design as my cover album and playing around with my scrapbook embellishments to complete my decor. Then I continued to decor the rest of my pages.

What I love about the Yes, Please! paper pad is that it also came with sheets of mini cards and embellishments that are perfect for our mini scrapbook album!
Another thing I like to do is typing the words and phrases in varying sizes and font styles, printing them, and using them on my page for additional design. Try it out!
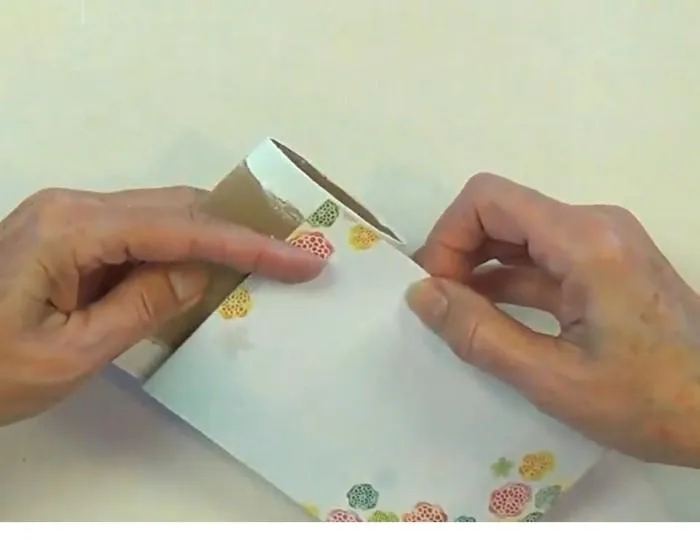
Plus here's a cool tip: To make those DIY mini-pocket strips, I used my Tim Holtz mini-attacher tool on both ends. But you can also glue down both ends of the strips and leave the middle vacant so you can use it as a mini-pocket!
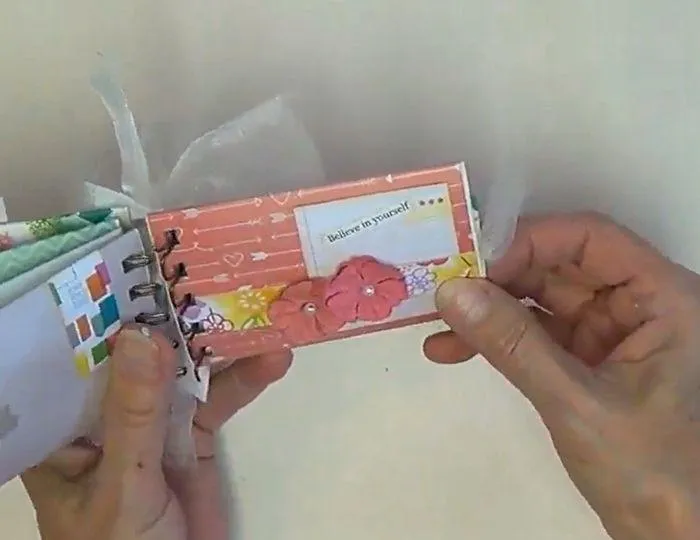
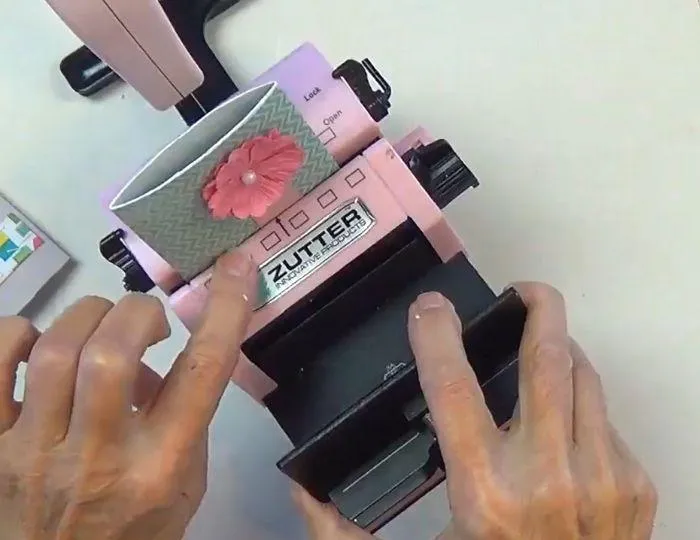
Step 4. Keeping Your Scrapbook Album Together with Ring Bind.
Before you start punching your cardboard rolls, don't forget to check how much you want your tags to be sticking out.
For my mini-album, I have to also consider the side where I'll be doing my ring bind on the left side. As this is a space my tag will not use, I'm measuring my tag beyond that and also the overhang on the right side.
To create the holes for our ring binding I'm using my Zutter bind-it-all tool. But if you don't have one, you can use a regular hole puncher too! Just measure up your cards properly so they align right when you punch through them.
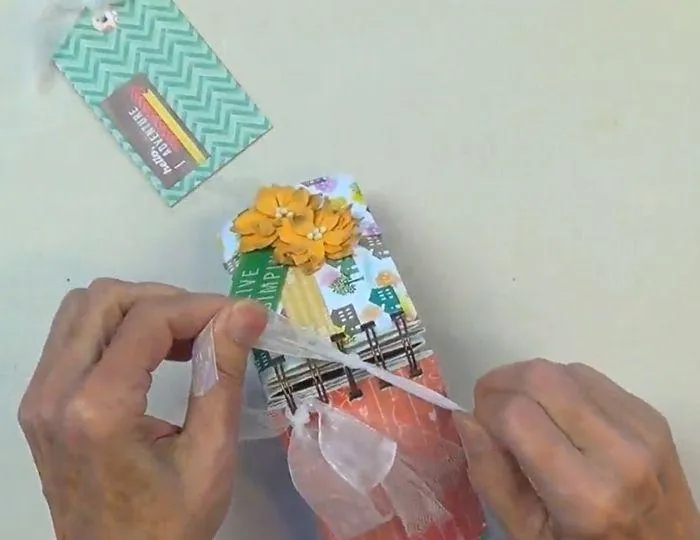
After we're done creating the holes for the ring bind, it's time to put our photo album together!
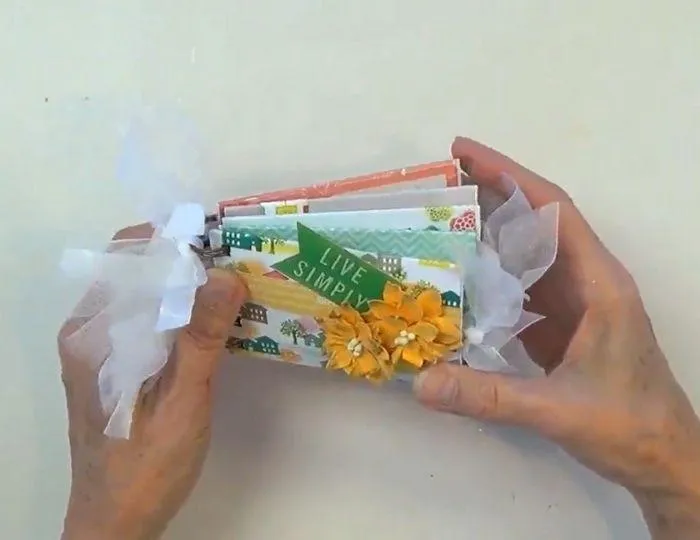
Remember those ribbons and lace? I'm going to tie them to the rings to add some fun frills to our mini scrapbook album!
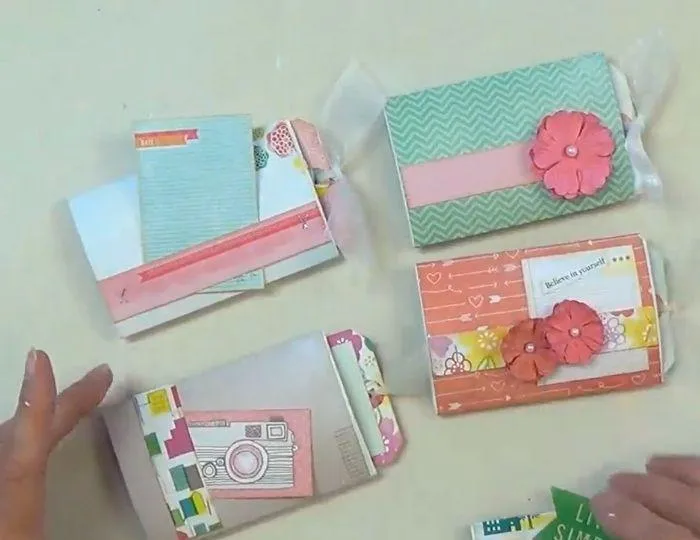
And now we're all done! Look how pretty our mini scrapbooks came to be! Who would've guessed that they were made out of toilet cardboard rolls, right?
I hope you enjoyed creating this mini scrapbook album with me! ♥
HERE'S SOME OTHER SCRAPBOOKING ARTICLES THAT YOU MAY FIND HELPFUL
The Top 5 Scrapbooking Tools That Are Proven To Help You Create Better Layouts
12×12 Scrapbook Layouts Tips You Should Never Miss!
5 Tips To Creating Catchy Scrapbook Titles For Your Layouts
TOP 5 Scrapbooking Ideas I LOVE!
How to Scrapbook: The Ultimate 'Learning How to Scrapbook for Beginners'
Scrapbooking Tips: 10 Tips To Help You Create Even More Enchanting Pages!
5 Simple Scrapbook Organization Ideas and Tips!
Scrapbook Stores Online: Shop from the Top 7 Best Craft Stores
Contact Us | Login | Store | About | Reviews | Privacy Policy | Terms & Conditions | Returns
Copyright © 2025 by ScrapbookingCoach.com
We accept payment with:
