6 DIY HALLOWEEN SCRAPBOOK IDEAS
Celebrate Halloween by creating these fun and spooky layout ideas!
I don't know about you, but I love scrolling through Pinterest and scrapbooking forums for Halloween scrapbook ideas as it's such a fun theme to celebrate. Do you know what else I really enjoy? Browsing papercraft supply bargains at my local craft store for my Halloween scrapbook layouts!
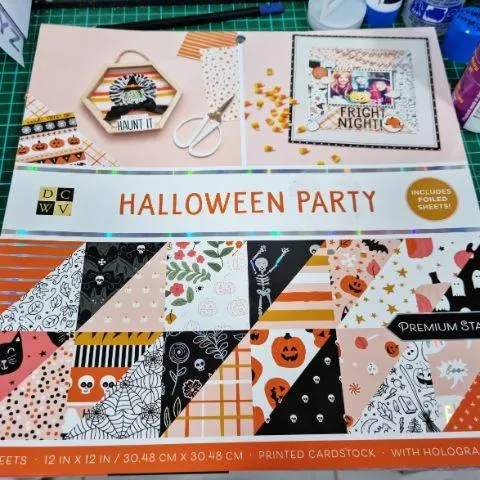
I recently found this great Halloween themed 12-inch x 12-inch cardstock stack on special and I just love it. It really motivated me to get going with my Halloween scrapbook ideas and layouts. The stack has no "dud" or "filler" type pages and is a great mix of cute prints, graphics, novelty hologram pages, and words.
TABLE OF CONTENTS:
1. Hey Boo!
2. Witch Hat
3. Plain And Patterned
4. Dark Patterned Background
5. Triangles
6. Patterned Paper Strips
7. Final Thoughts
Using this newly purchased Halloween themed cardstock, some DIY Halloween scrapbook titles, and a few pieces of plain colored cardstock, I came up with these Halloween themed layouts and I would love to share my ideas with you.
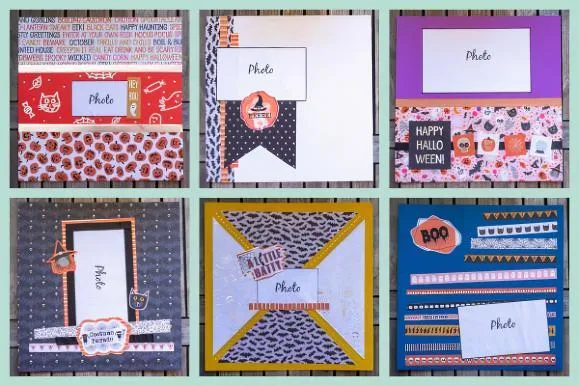
#1 HALLOWEEN SCRAPBOOK IDEA
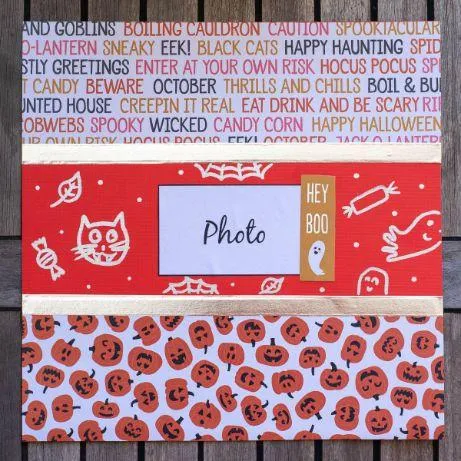
This layout idea works well with any combination of Halloween themed patterns
This Halloween scrapbook layout uses a mix of Halloween print cardstock, plain cardstock and washi tape. Working with a red 12-inch x 12-inch cardstock base, I cut two strips of patterned cardstock measuring 4-inch x 12-inch and adhered these to the top and the bottom of the cardstock base.
This left a nice 4-inch thick red panel in the middle on which to adhere my photograph. Two 12-inch strips of washi tape were used as a border between the strips of color and using a silver paint pen, I outlined some childish Halloween shapes onto my red cardstock.
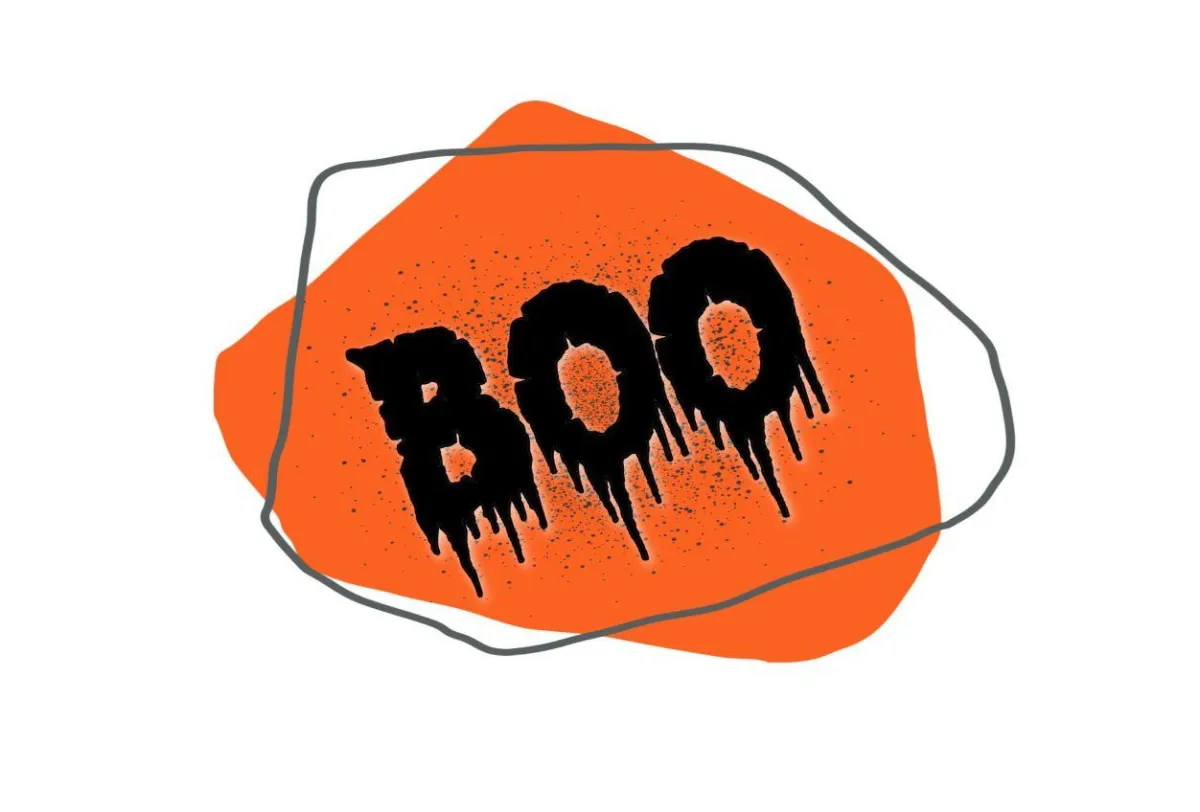
Finally, I finished this Halloween scrapbook idea with a cute title cut straight from my new Halloween cardstock that read, "Hey Boo".

#2 HALLOWEEN SCRAPBOOK IDEA
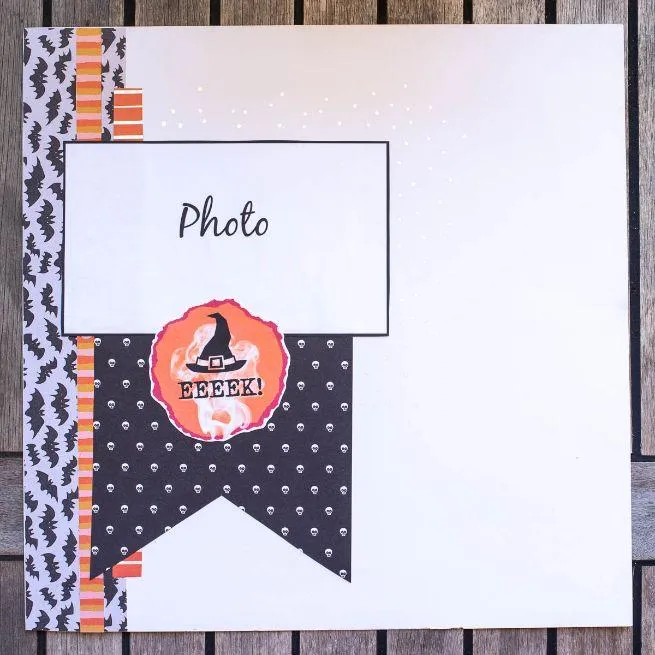
A simple layout design usingscraps of themed paper and diy printables
This Halloween scrapbook layout features a lot of white space and uses a mix of Halloween print cardstock and a DIY Halloween scrapbook title which I printed directly onto white cardstock.
Beginning with a white 12-inch x 12-inch cardstock base, I cut a few 12-inch strips of patterned cardstock in different widths and adhered them to the left edge of the layout vertically.
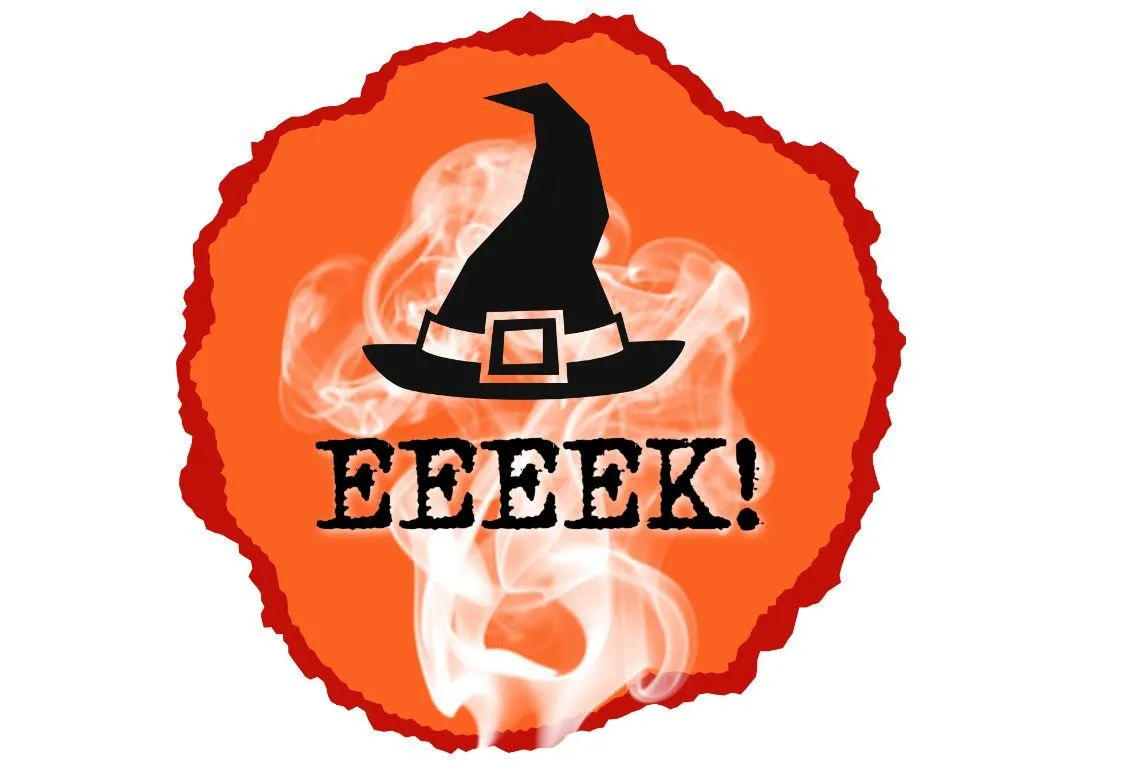
The photo was next, followed by a flag shaped scrap of Halloween pattern. Finally, I cut my DIY printable out from the white cardstock and adhered it on top of the photo and flag.
Although you can barely see it in the photograph, I also used a silver paint pen to add some dots around the photographs in the white space.
#3 HALLOWEEN SCRAPBOOK IDEA
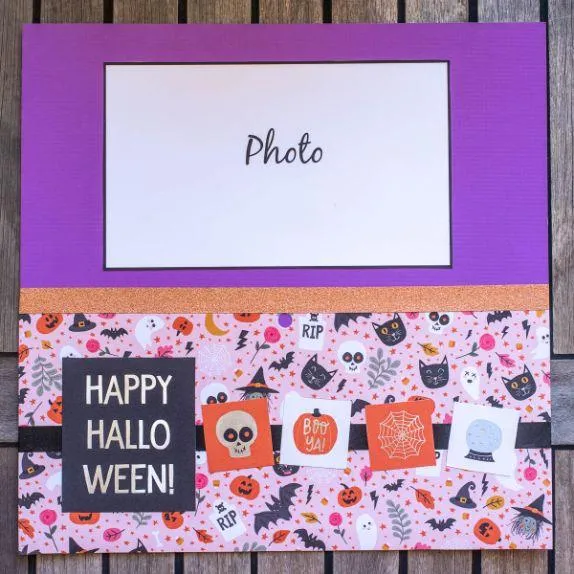
Having a plain space helps you bring focus to your photo
This Halloween scrapbook layout leaves space for a large photograph, using a mix of plain and colored cardstock as well as washi tape.
Starting with a purple 12-inch x 12-inch cardstock base, I adhered a patterned piece of cardstock measuring 6-inch x 12-inch onto the bottom half of the layout.
From here, my photo was placed on the top non-patterned section and left untouched so that the photo could be the main focus.
All of the other elements were placed on the bottom section of the layout. This also ensures that my layout does not look too cluttered.
Two strips of 12-inch washi tape were placed horizontally. One at the half way point where the pattern and solid cardstock clash, and another half way up the bottom section at around the 3-inch mark.
The title, "Happy Halloween!" and the four images contained in squares were cut out from a page in my new Halloween themed cardstack.
#4 HALLOWEEN SCRAPBOOK IDEA
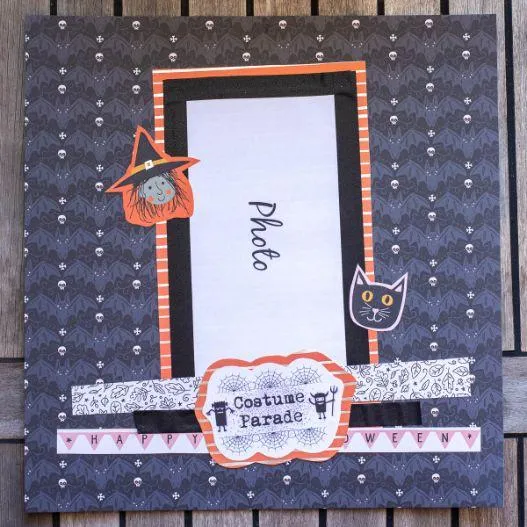
Add accent to your layout by adding bright colored elements and borders
This Halloween scrapbook layout features a dark patterned background and a DIY Halloween scrapbook title which I printed directly onto white cardstock, cut out, and then mounted onto some striped orange holographic cardstock.
Beginning with a dark, skull patterned 12-inch x 12-inch cardstock base, I mounted the photograph onto the same holographic orange striped cardstock that my DIY title was mounted onto and adhered both to the base. A strip of black washi tape was then used as a border around the photograph.
Next, I adhered some thin strips of Halloween printed cardstock horizontally towards the bottom of the photograph and finished it off with the DIY printable and a cute witch and cat graphic found in my Halloween themed cardstock.
#5 HALLOWEEN SCRAPBOOK IDEA
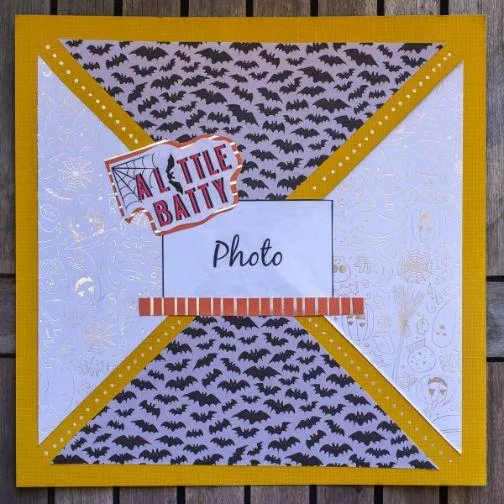
This Halloween scrapbook layout features a DIY printable for the title and four triangles cut from two different pieces of patterned cardstock. Although it's hard to tell from the photograph, one of the prints uses a cool silver holographic type outline for the artwork.
Starting with a deep yellow 12-inch x 12-inch cardstock base, I chose two different patterns of Halloween themed cardstock and cut two triangles of the same size from each.
They were adhered to the base in a uniform manner, leaving a gap around the edges and between the triangles. Using a silver paint pen, I then added some dots in the gaps between the triangles.
Next, I stuck down my photo and an orange striped strip of cardstock that sits underneath the photograph. To finish it off, I printed out my DIY Halloween printable onto white cardstock, cut it out, and adhered it to the top left of my photograph.


#6 HALLOWEEN SCRAPBOOK IDEA
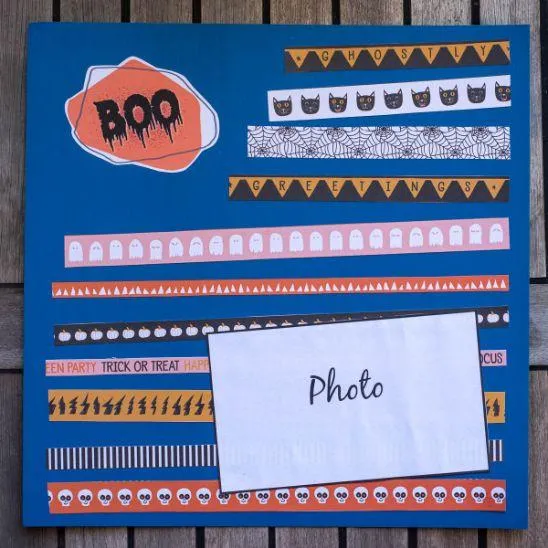
Create beautiful layouts in minutes by using strips of patterned paper and a diy printable title
This Halloween scrapbook layout features a DIY printable for the title and many narrow strips of patterned paper from my new Halloween themed cardstock.
Beginning with a dark blue 12-inch x 12-inch cardstock base, I began by adhering my DIY printable to the top left of the layout. The reason I stuck this element down first, is that the strips of paper in the next step are placed around the title.
Next, I cut random straight strips from my patterned paper and stuck them down onto my cardstock base, making sure to cut some shorter to give my title some space of its own. To finish it off, the photograph was placed overt the strips in the bottom right hand section of the layout.
HAVE YOU EVER BEEN INSPIRED BY THE PATTERN ITSELF?
These six DIY Halloween scrapbook ideas were nearly entirely inspired by the new Halloween cardstock paperstack that I bought. I loved nearly every print in the whole stack and as a result, was very motivated to come up with ways in which I could use the different pieces.
Spoiler alert, I only used a few pieces and still have heaps left for next time!
HAVE YOU CREATED ANY HALLOWEEN SCRAPBOOK LAYOUTS YET?
Have you created any Halloween scrapbook layouts yet? If not, I really hope that one of these ideas inspires you to have a go. If you have, we would love to see your take on some of these designs or even one of your own creations.
Happy scrapping!
OUR BEST SELLING BOOKS


HERE'S SOME OTHER SCRAPBOOKING ARTICLES THAT YOU MAY FIND HELPFUL
The Top 5 Scrapbooking Tools That Are Proven To Help You Create Better Layouts
12×12 Scrapbook Layouts Tips You Should Never Miss!
5 Tips To Creating Catchy Scrapbook Titles For Your Layouts
TOP 5 Scrapbooking Ideas I LOVE!
How to Scrapbook: The Ultimate 'Learning How to Scrapbook for Beginners'
Scrapbooking Tips: 10 Tips To Help You Create Even More Enchanting Pages!
5 Simple Scrapbook Organization Ideas and Tips!
Scrapbook Stores Online: Shop from the Top 7 Best Craft Stores
Contact Us | Login | Store | About | Reviews | Privacy Policy | Terms & Conditions | Returns
Copyright © 2025 by ScrapbookingCoach.com
We accept payment with:
